Integrating ChatGPT using OpenAI 4 into a NextJS 13 Web app
Step-by-step guide to integrate ChatGPT to supercharge your NextJS project.
As a developer, connecting to Chat GPT can significantly enhance the apps you build. It allows you to integrate advanced conversational capabilities that can mimic human-like interactions, making your applications more engaging for users. This is especially useful for customer support systems or any interactive service within your app.
Chat GPT's ability to learn from past interactions means it continually improves, providing a
better experience over time.
However, if you don't incorporate this capability, you might miss out on these benefits. Your apps could seem less responsive and intelligent compared to competitors who utilize such AI features. Users today expect smart and convenient interactions, and without Chat GPT, your app may not meet their expectations. This could lead to lower user satisfaction and engagement, which are crucial for the success of your application.
So, by tapping into the power of Chat GPT, you're not just adding a feature; you're future-proofing your app and staying ahead in the tech game.
Connecting to Chat GPT doesn't need to be a pain though.
Here's a handy guide I developed to get you started.

Today we will go through the process of creating a simple web application that uses openAI chatGPT, from the backend all the way to the frontend so we can consume and have a production ready application. We will learn how a call to chatGPT API works, how to consume it and display it in a small frontend application.
We will be using the following:
- NodeJs v18+
- NextJs v13+
- OpenAI v4+
- Tailwind CSS
- Npm or yarn
Setting up the NextJS project
Where to start?, we will create our project where we will add our fancy code to create our app, and the steps are simple:
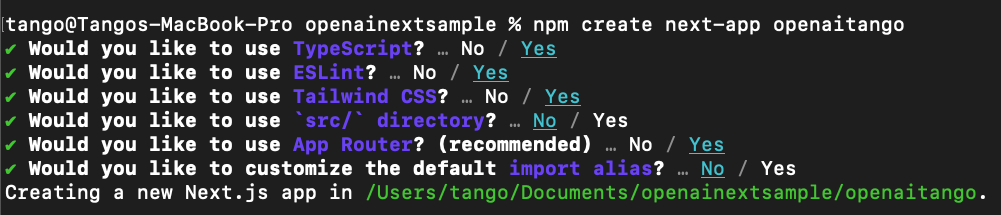
First, we create a next project
npm create next-app ‘Your project name’
Here is the configuration we will be using for this project:
Done!, we have created a functional NextJs web application (easy right?!). Now we will test our project so we proceed to navigate to the installation folder and run our project with npm run dev
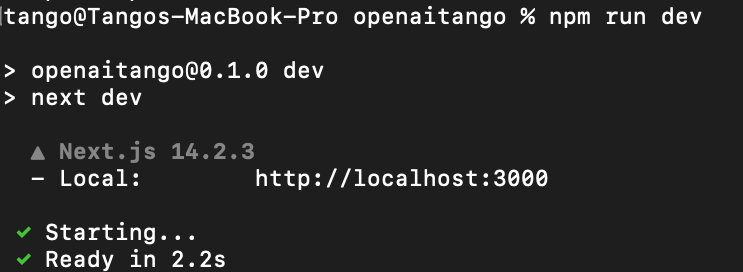
And its up and running!, open a web browser and navigate to http:localhost:3000 you should see the NextJs default template:
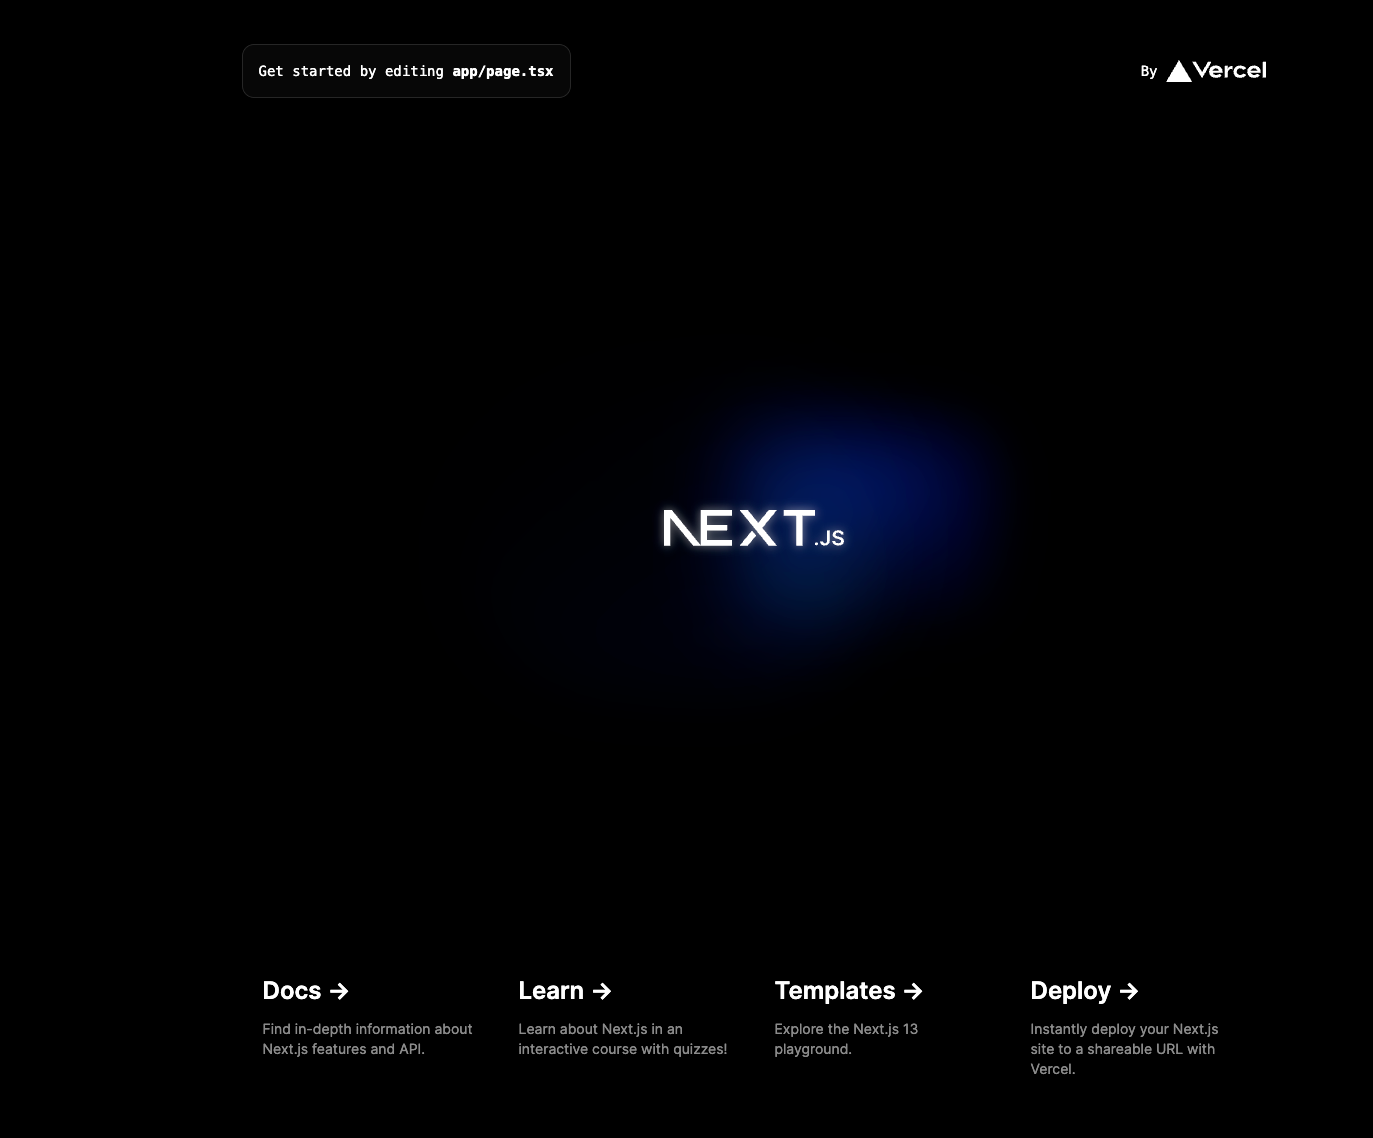
That’s the default page of a NextJs application, simple and clear, later we'll customize it to display our prompts with the AI.
But first we need to actually connect with Open AI to be able to use chatGPT.
Integrating OpenAI web API key in our project
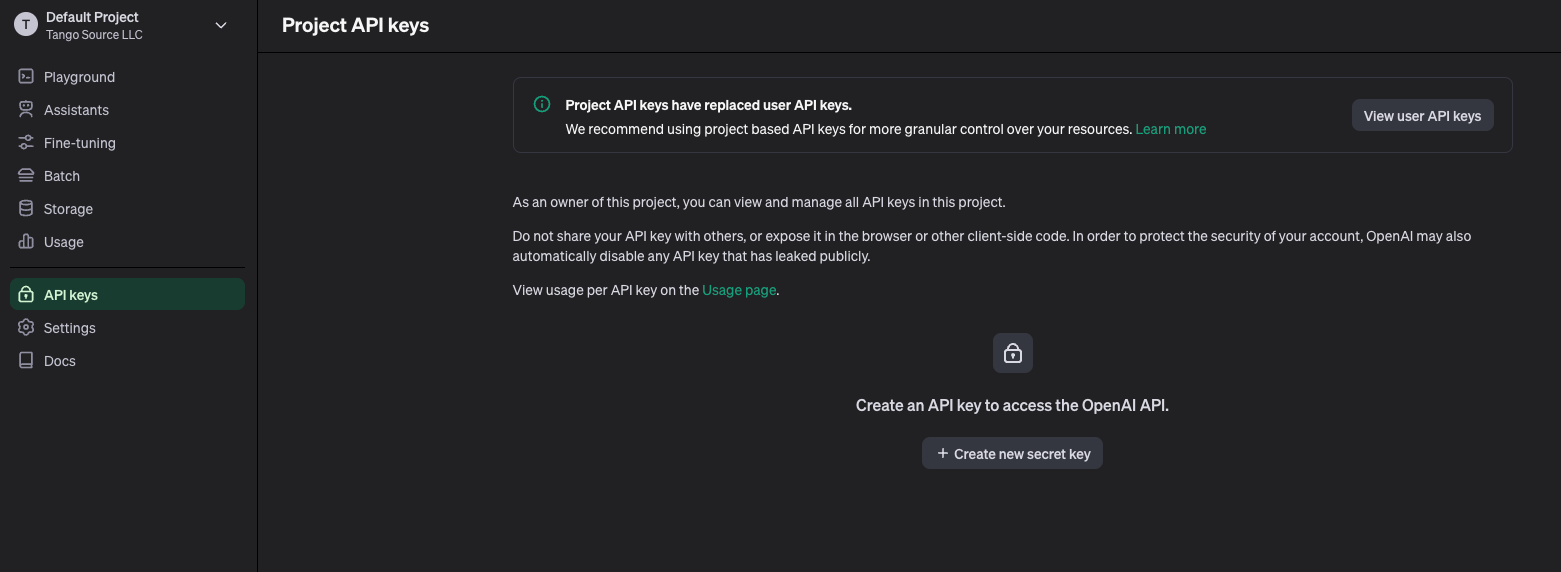
So, how do we add OpenAI to our new project?. Let’s start by going to https://platform.openai.com/ (you must create an account if you don't have one) and login.
On the left side menu go to “API Keys”, and click on create a new key. It will show us our private key to our account. Don’t share it! (Important: Save your key value somewhere safe since you cannot get it again).
Note: You must have balance in your openAI account to be able to use the web api since it is fee-based.
So far, so good. Next we need to configure our key into our project, to do that, open the project with your favorite IDE and you should see the project structure that will look something like this:
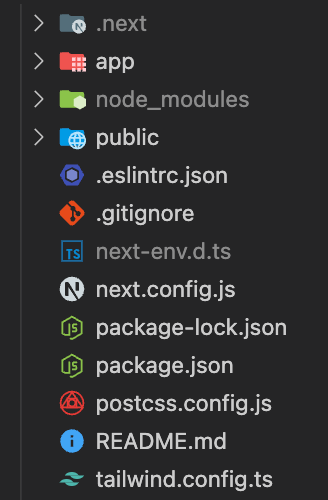
Neat uh?, Now we need a space to actually paste our awesome private key, so we will create a .env file in the top of our project, it should look like this:
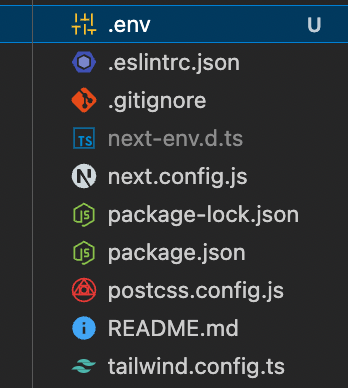
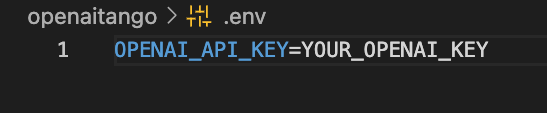
Now that we added the .env file, open it and paste in your top secret key from OpenAI. It should be like this:
Great!, now we need the actual library to use the chatGPT methods in our project.
To do that, go to your project in a terminal and type in npm install openai, once it is finished we are ready to start our script to ask questions using the chatGPT model.
Setting up the backend and creating requests
So, what next?. Are we there yet?. Almost!, we will now set up our API to make use of the chatGPT model through an API request.
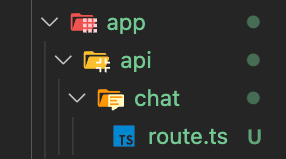
First, we will go to our app folder in our project and we will create a folder called api, then create a folder inside your freshly created api folder called chat, finally we will create a script called route.ts inside the chat folder.
At the end it should look like this:
This will allow us to make a request to our app, with the fancy url: http://localhost:300?api/chat
Now that we have the structure and the file, we need an actual request to the chatGPT API. So we open our
route.ts file and paste the following code:
import { NextResponse } from "next/server";
import OpenAI from "openai";
const openai = new OpenAI({
apiKey: process.env.OPENAI_API_KEY,
});
export async function POST(request: Request) {
if (!openai.apiKey) {
return NextResponse.json({
status: 500,
error:
"OpenAI API key not configured, please follow instructions in README.md",
});
}
const data = await request.json();
const prompt = data.prompt;
if (!prompt) {
return NextResponse.json({
error: "There was an error with your text, try again!",
status: 400,
});
}
const chatResponse = await openai.completions.create({
model: "gpt-3.5-turbo-instruct",
prompt: prompt,
max_tokens: 2048,
temperature: 0.8,
});
const response =
chatResponse.choices[0].text?.trim() "I'm offline, try again later";
return NextResponse.json({
status: 200,
text: response,
});
}
Note: You may get an error when importing the next and the openai libraries. To fix this go to the tsconfig.js file in the root of your project and change the moduleResolution to “node”.
This file pulls the key from the .env we created earlier, validates that it has data and then proceeds to create a request to get a response from the openAI API, pretty straightforward.
Now, we are ready to start making calls to the api in our backend!. To test it you can use a tool to make API request:
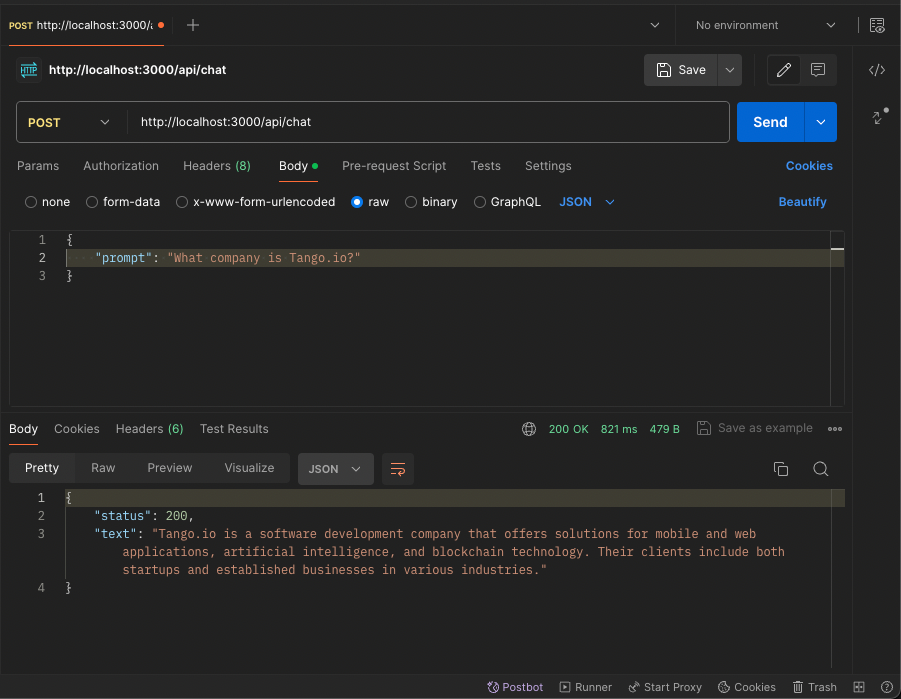
And…
it’s alive!. We are now connected to openAI GPT model!.
Integrating everything into the frontend
Now, how do we add our cool new API to our frontend?.
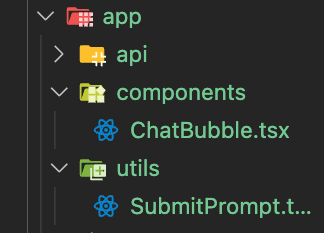
First, we will proceed to create all the directories and files we need to achieve this. Let’s start by creating another folder in our app folder called utils then create a file called SubmitPrompt.tsx.
Then, let’s create another folder in our
app folder called
components then create a file called
ChatBubble.tsx. The results should look like this:
Neat!, we got our files setup, what are these files for?.
Let’s start by adding code to our bubble component, this will be our core component to simulate a chat bubble, we set a userName prop to display a name for both of the user and the AI, we added some tailwind CSS classes to customize it and we will use the children props to pass the actual content of each chat bubble.
So let’s paste in our freshly created chatBubble.tsx component this code:
import React from "react";
type ChatBubbleProps = {
userName: string;
children?: React.ReactNode;
};
const ChatBubble: React.FC<ChatBubbleProps> = ({ children, userName }) => {
return (
<div className="flex-col items-end w-10/12 g-8">
<div className="flex-col py-4 px-8 relative items-start g-16 max-w-100 bg-slate-300 rounded-2xl whitespace-pre-wrap">
<div className="flex-col g-4">
<div className="text-black text-m font-medium mb-2">{userName}</div>
</div>
{children}
</div>
</div>
);
};
export default ChatBubble;
That should do the trick, now to our
utils SubmitPrompt.tsx let’s add this code:
export default async function SubmitPrompt(prompt: string) {
try {
const response = await fetch("/api/chat", {
method: "POST",
headers: {
"Content-Type": "application/json",
},
body: JSON.stringify({
prompt: prompt,
}),
});
const data = await response.json();
if (response.status !== 200) {
throw (
data.error new Error(`Request failed with status ${response.status}`)
);
}
return data.text;
} catch (error) {
console.error(error);
}
}
This will consume our API endpoint. And the great thing is that whenever we want to do a call in our app we just need to import this function and avoid rewriting code!.
Finally, we will wrap it up, open the
page.tsx file in our app folder and replace the contents with this code:
"use client";
import { useState } from "react";
import React from "react";
import ChatBubble from "./components/ChatBubble";
import SubmitPrompt from "./utils/SubmitPrompt";
export default function Home() {
const [promptInput, setPromptInput] = useState("");
const [result, setResult] = useState("");
const [isLoading, setIsLoading] = useState(false);
async function onSubmit(event: React.FormEvent<HTMLFormElement>) {
event.preventDefault();
setIsLoading(true);
try {
const result = await SubmitPrompt(promptInput);
setResult(result);
setIsLoading(false);
} catch (error) {
console.error(error);
}
}
return (
<main className="bg-slate-100 flex min-h-screen flex-col items-center justify-between py-12 px-2">
<ChatBubble userName="AI - ask away!">
<text className="text-black">{ isLoading ? "Loading..." : result}</text>
</ChatBubble>
<form
className="flex w-full items-center justify-center my-4"
onSubmit={onSubmit}
>
<ChatBubble userName="You">
<input
className="text-black w-full h-10 rounded-xl p-2"
placeholder="Ask something"
type="text"
name="question"
value={promptInput}
onChange={(e) => setPromptInput(e.target.value)}
/>
<button
className="text-sm w-auto h-auto p-4 my-4 bg-green-600 h-7 text-white rounded-2xl"
type="submit"
>
Ask!
</button>
</ChatBubble>
</form>
</main>
);
}
We are making use of our chat bubble component to display the data, to the user bubble we added an input linked to a react state to send the prompt to the backend with a form and to the GPT bubble we just added a string that will be the result of the prompt.
Now save it, reload our page and test it out!.
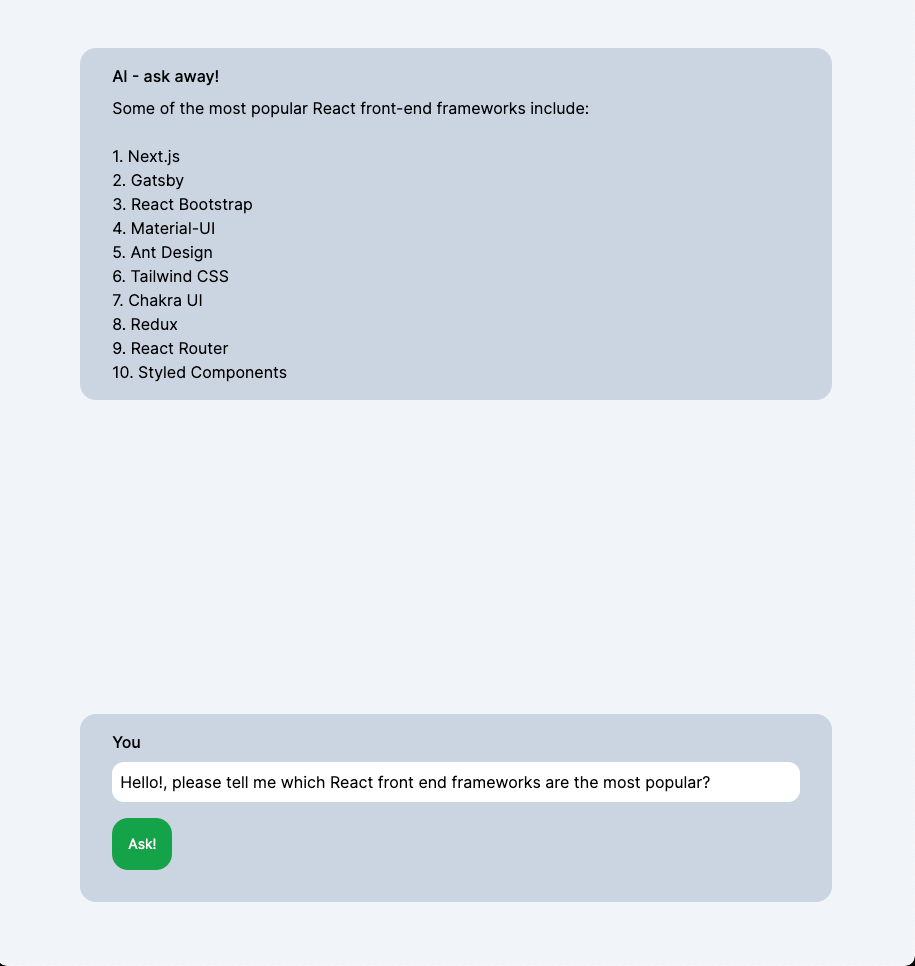
It works!.
At this point, We can confidently say that we have integrated ChatGPT and NextJS 13 in the most straightforward manner possible. Deploying this web app is also pretty simple. By running vercel --prod in the terminal, Vercel will take care of everything for us.